
This is a strikingly beautiful Eagle which obtains its colourful adult plumage at around 7 years. Identifying this eagle is quite easy as it has a very short tail (ecaudatus in Latin)
The words "Bateleur" in French and "Gaukler" in German both describe this bird as an acrobat or street performer - a basic description of the way the bird rocks its wings from side to side as it glides making it look like it is trying to catch its balance. I believe its amusing ruffle adds even more to this unique description..

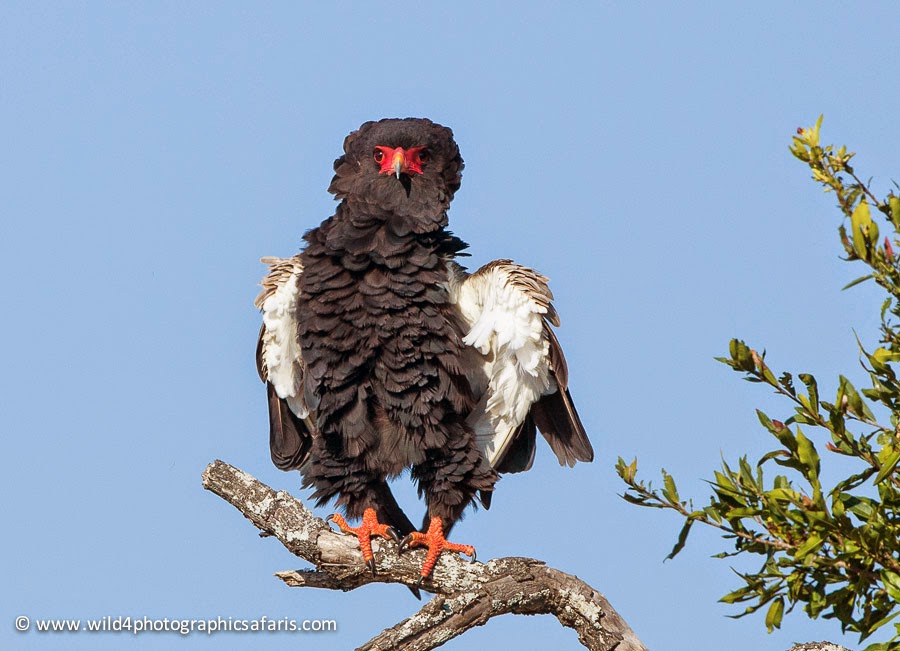
Last year in the Kruger Park, South Africa we came across this perfect scenario of a Bateleur in good morning light with a blue sky background.. this is a very good opportunity to sit and wait with the subject - what for ? either a ruffle or a take off or both if you are lucky !
My usual method for shooting birds is to first get a good quality "perching shot" and then change my settings and wait for some action - i.e. a ruffle or a take off
In MANUAL MODE I chose 1/320 @f8 ISO 100 the shutter speed of 1/320 was more than enough to freeze a medium sized eagle like this and it enabled me to have a very good quality ISO of 100. I set my aperture at f8 to get a good depth of field, and sharpness out of my lens (which is why I often shoot at f8 if I can). Blue sky backgrounds are excellent for this depth of field as the background (blue sky) cannot become distracting in anyway, not like a foliage background which can become distracting depending on which aperture you use.
Once I got the "perching shot" I rolled my "finger dial" to the right to reach 1/2000 sec which is a good speed to freeze a bird of this size if it ruffles or takes off. 8 "clicks" of my finger dial to the right, (or 8 thirds of a stop) took me to 1/2000 sec, i.e.
1/320 -
1/400 - 1/500 - 1/640 - 1/800 - 1/1000 - 1/1250 - 1/1600 - 1/2000
1 2 3 4 5 6 7 8
To obtain the exact same exposure as before, I then changed my ISO from 100 to 640 - this was also 8 "clicks" (or 8 thirds of a stop) on my "finger dial" i.e.
100 - 125 - 160 - 200 - 250 - 320 - 400 - 500 - 640
1 2 3 4 5 6 7 8
I left the aperture at f8 and was prepared to capture a technically good shot of the pending ruffle and take off at 1/2000 sec f8 ISO 640.
The ruffle can be over in a heartbeat, so you have to be patient and always looking through your lens. It is a really annoying rule with wildlife photography that the second you look away or take a break from your watch, the action happens and you will miss it, so stick it out for as long as it takes !
Birds usually give a short warning sign that they are about to ruffle - they puff out their feathers and then they let loose :)

PUFFING UP THE FEATHERS IS A GOOD INDICATION THAT THE
BIRD IS ABOUT TO RUFFLE
An important point worth mentioning is that I always have my drive mode on HIGH. The more FPS (frames per second) your camera can do, the more effective it will be in wildlife photography. You cannot possibly predict when to take the best shot of wildlife in any action scenario, animals are simply too fast as you will see in the following sequence. Having your FPS on its highest setting all the time will help you to capture great action sequences where you can later choose the most pleasing frame from the greatest selection of frames that your camera was able to capture. There are of course scenarios where you do not need 10 FPS and you can change it for such scenarios, remember though to set it back to HIGH (H) or continuous high when you are finished.

So here is the ruffle sequence shot on my Canon 5Dmk3 which can push out 6 FPS. The whole sequence took 2,5 seconds and I managed to get 16 images. In my opinion there is only one image that stands out as being the best.
I have made comments beneath the photos.
shot details: Canon 5Dmk3 500mm f4 lens
1/2000 sec @ f8 ISO 640 - manual mode
ALL IMAGES THE SAME

1.
Pretty good - nice head but wings are not very interesting

2.
Same comment here
3.
Wings look even more awkward

4.
Not too bad - nice head pose

5.
Wings not good at all

6.
My second favourite

7.
My favourite - the wings are balanced, the head is tilted and there is a nice catchlight in the eye

8.
Nice head but wings are not balanced

9.
Head and wings are not good

10.
Wings are very bad

11.
Wings are good but head is down and no catchlight in the eyes

12.
Wings are not good and head is down

13.
no !

14.
Looks squashed !!

15.
A bit comical but not a good "ruffle shot"

16.
The end - all over in 2,5 seconds
From my burst of 16 shots, one to me stands out as the clear winner (number 7) with a second one that is useable (number 6). I have kept the sequence for the purpose of this article, but usually I would only keep 6 and 7 and delete the rest.
It just goes to show that for this kind of wildlife action, your frame rate (FPS) offers you a real advantage, so if you have it, turn it on to HIGH. Shots that show something more than a simple portrait or record of a species are what you should always strive for. Use your equipments technical capabilities to its fullest - know what its limitations are and work hard to come up with techniques that will cover every eventuality.
Back to the behaviour side of the scenario in front of us, the Bateleur has just given us a fantastic ruffle - keep looking through your lens !!!- this is not the time to review your shots to see if you nailed the ruffle - why ? because birds often take off soon after they ruffle.
Before take - off birds will also often defacate, shuffle their feet, reposition to face into the wind as well as look intently in one direction, look out for these signs and be ready.
Larger birds usually fill your viewfinder a bit better than small birds and so your auto focus tracking has a pretty good chance of keeping up with the subject if it takes off. I usually have the centre focus point active on the subject and in the middle of the frame. As the bird takes off, you have to do your best to keep it in frame, hold down the tracking focus and fire away. FPS will also come into play here as the bird flies. The shutter will capture the wings in different positions during the wing beat and one will naturally look better than the rest.
Also watch out for distracting backgrounds where the shape of the bird gets "lost: against a scruffy background of sticks, branches and foliage. On arrival at a perched bird sighting I always assess whether or not it will be a good take off shot if the bird does indeed take off. If I can see it will have a distracting background I usually get my perching shot and then move on to something else.

Not too bad, but the nictitating membrane is half covering the eye

An awkward wing position

Not too bad but the wings are not clearly outlined against the scruffy background

same comment as above

My Favourite from the take - off sequence as it has the cleanest background and there is a good amount of underwing showing that this is clearly a male Bateleur with the broad band of black primary feathers on the underwing. Females have a thinner black band on the underwing.
SHOOTING IN MANUAL MODE**
Those of you who know me, know that I am a big fan of shooting in Manual mode. The scenario above was a perfect opportunity to shoot in MANUAL.
Why ?
Firstly the light was perfect, it was constant and not changing, the light falling on the subject in every shot was the same.
Secondly for the purpose of this article, I was able to batch process my images with just one click of a button. Shooting this sequence with the same Manual Exposure settings enabled me to apply my changes in Lightroom to only one image. I was then able to easily batch process and synchronise my settings to all the other images in the sequence.
If this had been shot in AV or A mode, or even manual shutter, manual aperture and auto ISO, the cameras exposure meter would have picked up small differences as it tried to average the light, this would certainly have been the case when the Bateleur flew in front of the tree, the light meter would have averaged a different set of light values compared with the meter reading it would have averaged from the blue sky and the Bateleur. This would have resulted in changes of up to a full stop of light between the frames making it difficult to batch process them.
The point above also applies if you were shooting in Auto White Balance - I always prefer to shoot on Manual White Balance (setting my KELVIN value myself) or even using a preset white balance like "cloudy" or "daylight"
Auto White Balance can attach a different white balance value to each of the shots in a sequence - yes if you are shooting in RAW this can be changed later as it is not embedded like it is in a JPEG, but you will still have to change each one individually to make sure your batch has exactly the same white balance value.
Shooting in Manual White Balance will teach you more about your camera's white balance capabilities - something that is crucial to understand when shooting videos with your DSLR.
Look out for next months post titled "10 LEOPARDS OF MALA MALA"
Stu - Great tutorial but can't I batch apply my kelvin in Lightroom. I have started shooting manual Kelvin but sometimes get it wrong and I do a batch apply. I think the same would be true if I was shooting Auto WB so I would say that Kelvin is not a big issue like using AV. :-)
ReplyDeleteHi Kevin ! i hope all is well :)
DeleteAs you know shooting Kelvin in RAW is not a big issue at all, if shooting in Jpeg it is a bigger concern if you get it "wrong" To me, a major part of photography is knowing the technical side of your camera, knowing what Kelvin is and does is just one part of the technical side I like to take on as a challenge. To me Auto WB gives me inconsistent results and if I want to quickly switch over to Video, remaining in Auto WB will create a flicker effect on my video as the WB will change depending on what you are pointing at.. so for me shooting in a preset WB or in Kelvin makes more sense.. and yes you can still batch correct the WB later if you want to. batch correcting images shot in Auto WB is not as easy as the values can be different from shot to shot... - the same will apply to your exposure when shooting in AV or A mode..
Invaluable information for the novice photographer. Do you have more?
ReplyDeleteThank you Vera !
DeleteI enjoy these posts Stu. We look forward to some of this very sort of advice when we arrive soon. We always pick up a few more tips and experiences that help us improve our wildlife photography. See you soon.
ReplyDeleteHi Larry - looking forward to the trip with you and Debbie !! glad you enjoyed it
DeleteGreat tutorial Stu! Your knowledge of wildlife habits is impressive, and probably one of the most important aspects of wildlife photography. I enjoyed our safari together, and hope to photograph with you again soon!
ReplyDeleteThanks Robert ! would be great to see you on safari again, all the best !
Delete